
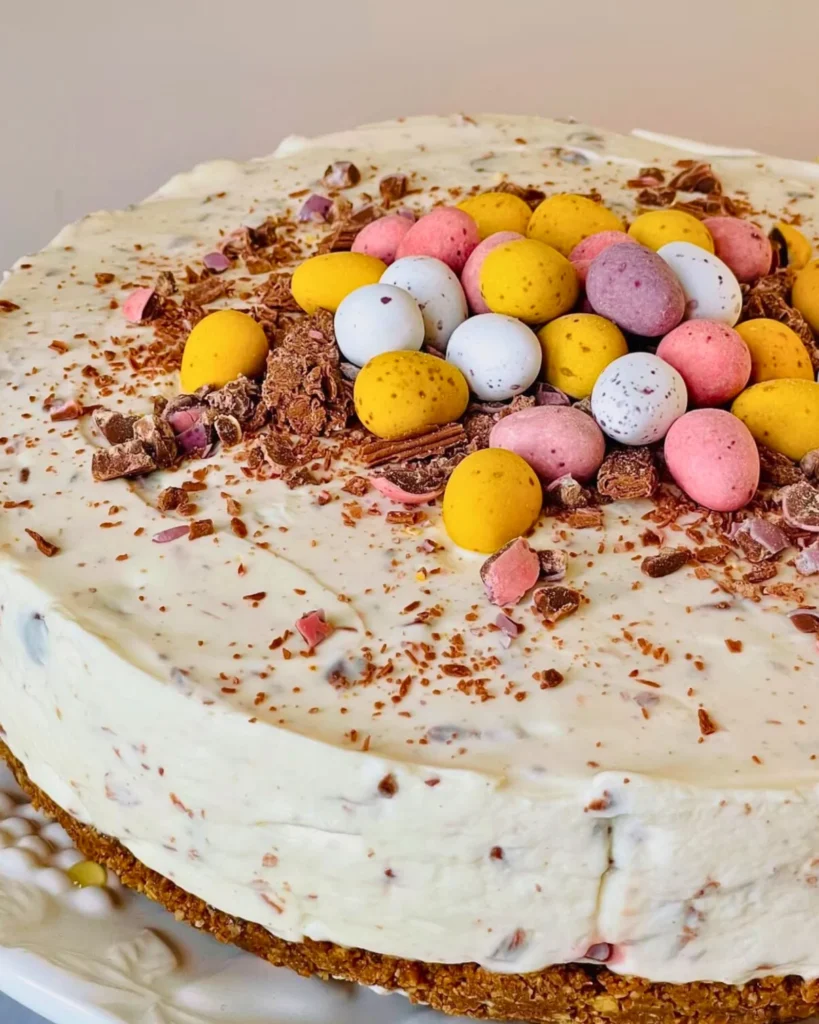
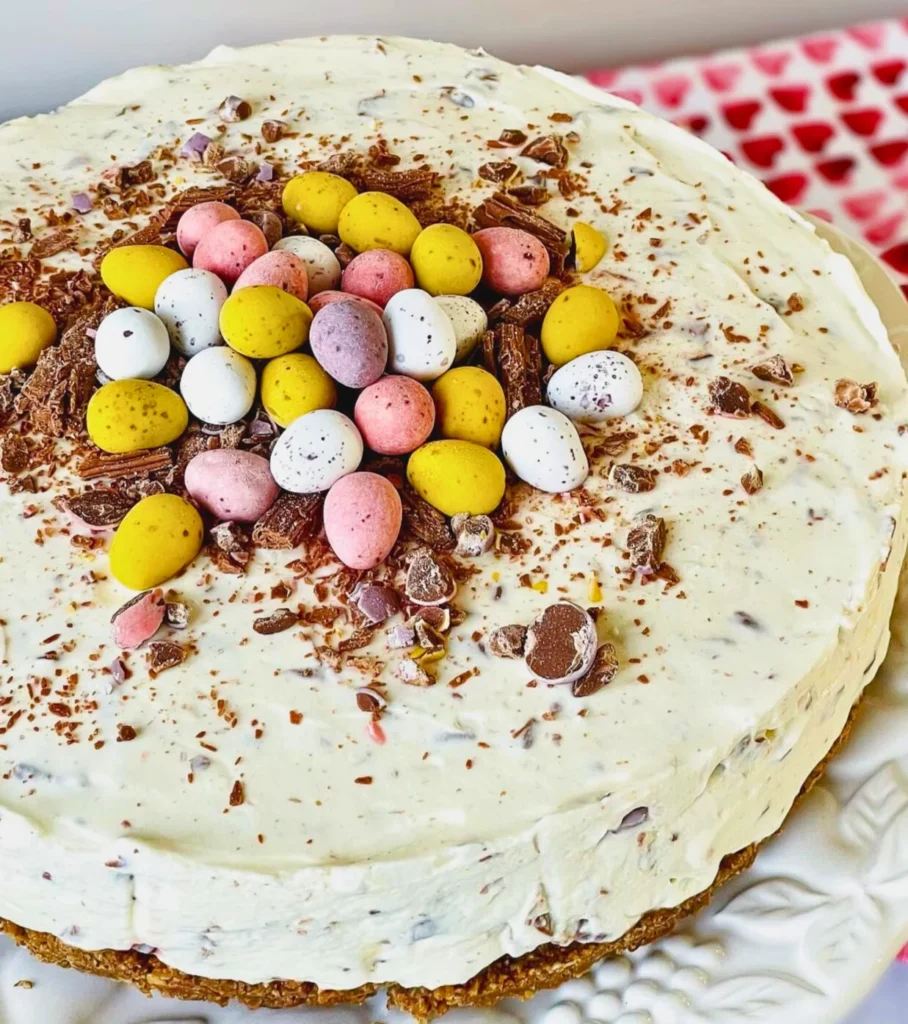
If you’re looking for the ultimate Easter showstopper, this Mini Egg Cheesecake is it. Imagine a buttery chocolate biscuit base, topped with a creamy vanilla cheesecake filling swirled with melted chocolate and crunchy crushed Mini Eggs. It’s indulgent, festive, and—best of all—completely no-bake. That means less stress in the kitchen and more time enjoying dessert with your loved ones.
Whether you’re planning a family gathering, a spring party, or simply craving something sweet, this cheesecake hits all the right notes: creamy, chocolatey, and full of texture. And the colorful Mini Eggs make it look as fun as it tastes.
Why You’ll Love This Mini Egg Cheesecake
This recipe is more than just a cheesecake—it’s a celebration on a plate. The flavors balance beautifully: rich cream cheese, sweet chocolate, and that satisfying crunch of the candy shell from the Mini Eggs. The texture is smooth yet studded with little surprises in every bite.
You’ll love how easy it is to make. There’s no baking involved, which makes it perfect even if you’re not a confident baker. All you need is a little chilling time in the fridge, and your cheesecake sets into a sliceable, luxurious dessert.
It’s also versatile. While it shines as an Easter treat, you can adapt it for birthdays, parties, or any time you want to add a pop of color and fun to your dessert table.
The Ingredients Breakdown
Every ingredient in this cheesecake has a role to play, and understanding why helps you get the perfect texture and flavor.
The chocolate Hob Nob biscuits create a crunchy, slightly oaty base that complements the smooth filling. If Hob Nobs aren’t available, you can swap them for digestive biscuits or even Oreos for a richer chocolate taste.
The butter binds the crumbs together and ensures the crust holds its shape when sliced. Using real butter gives the best flavor, but a good-quality spread works in a pinch.
The star of the filling is, of course, full-fat cream cheese. Don’t be tempted by the lighter versions—they simply won’t set as firmly or taste as indulgent. The cream cheese is sweetened with icing sugar, which dissolves smoothly, keeping the filling silky.
To lighten the mixture, we fold in double cream. Whipping it just until it holds shape creates that airy mousse-like texture. A splash of vanilla extract adds warmth and depth, enhancing the overall flavor.
Then comes the fun part: Mini Eggs and melted chocolate. The crushed Mini Eggs add crunch and color throughout the filling, while the melted chocolate brings richness. For decoration, an extra scattering of Mini Eggs and a crushed Flake give that perfect bakery-style finish.
Step-by-Step Instructions
Making this cheesecake is a joy—it’s straightforward, fun, and quite forgiving. Here’s how it comes together:
- Make the base by crushing your chocolate Hob Nobs into fine crumbs and mixing with melted butter. Press the mixture into a springform tin to create an even layer, then chill.
- Prepare the filling by whisking cream cheese, icing sugar, and vanilla until smooth. Whip the cream separately and fold it in gently, creating a light mixture.
- Add the chocolate and Mini Eggs, stirring just enough to combine. You want a marbled effect rather than overmixing.
- Chill the cheesecake for at least 4–5 hours, though overnight is best for the perfect set.
- Decorate before serving with crushed Flake and extra Mini Eggs for a festive, colorful look.
Tips for the Perfect Cheesecake

One of the most common questions about no-bake cheesecakes is how to get them to set properly. The key is using full-fat cream cheese and whipping the cream to the right stage—not too soft, but not over-whipped either. Folding it in slowly ensures the mixture stays airy rather than heavy.
When pressing your biscuit base into the tin, use the back of a spoon or even a potato masher. The firmer you press, the sturdier your base will be once chilled.
For extra neat slices, dip a sharp knife in hot water, wipe it dry, and cut through the cheesecake cleanly. This trick gives picture-perfect servings every time.
If you’re making this cheesecake in advance, decorate it just before serving. The candy shell on Mini Eggs can absorb moisture in the fridge and lose some of their shine if left too long.
Variations to Try
This cheesecake is endlessly adaptable. If you want a different twist, try swapping the Mini Eggs for Maltesers, crushed Oreos, or even fruit like raspberries for a tart contrast. For Christmas, red and green M&Ms make a festive substitution.
You can also play around with the base. Digestives create a classic flavor, while Oreos give it a darker, richer bite. If you want to reduce the sweetness, try using plain tea biscuits or even ginger snaps for a spicy kick.
Another fun variation is turning this recipe into mini individual cheesecakes using cupcake cases or ramekins. They’re perfect for parties and portion control.
Nutrition Breakdown
This cheesecake is undeniably indulgent, but sometimes that’s exactly what dessert is meant to be. A slice provides a balance of carbohydrates from the biscuits and sugar, fats from the cream cheese and cream, and a touch of protein from the dairy.
Because it’s rich, you don’t need a huge portion to feel satisfied. A thin slice alongside a cup of coffee or tea is the perfect treat. And while this isn’t a low-calorie dessert, you can make lighter adjustments—such as using reduced-fat cream cheese and lighter cream—if you want a slightly less decadent version.
Serving Suggestions
This cheesecake makes a gorgeous centerpiece for Easter Sunday lunch, but it’s equally fitting for birthdays, family gatherings, or simply a cozy weekend dessert. It pairs beautifully with a fresh fruit salad, balancing the richness with a refreshing note.
For drinks, a strong espresso or cappuccino highlights the chocolatey base, while a glass of cold milk makes it extra comforting. If you want something a little more grown-up, a glass of Baileys or a dessert wine complements the creamy filling beautifully.
If you’ve made something like my chocolate trifle or even a fruity pavlova before, this cheesecake offers a similar sense of occasion but with its own unique twist.
Storage and Make-Ahead Tips
No-bake cheesecakes are ideal for making ahead of time. Once assembled, this Mini Egg Cheesecake keeps well in the fridge for up to three days. Store it in an airtight container or cover the tin with clingfilm to prevent it from drying out.
If you’d like to prepare it even further in advance, the cheesecake can be frozen without its topping. Wrap it securely in clingfilm and foil, then freeze for up to one month. Thaw overnight in the fridge before decorating and serving.
Leftovers (if you’re lucky enough to have them) should be stored in the fridge and enjoyed within a couple of days. The base may soften slightly over time, but the flavor remains delicious.
Final Thoughts
This Mini Egg Cheesecake is everything you want in a no-bake dessert: simple to make, visually stunning, and irresistibly delicious. With its creamy filling, crunchy chocolate base, and playful bursts of Mini Eggs, it’s guaranteed to put smiles on faces.
Whether you’re making it for Easter, a springtime celebration, or simply as a treat for yourself, this cheesecake proves that sometimes the most joyful desserts are the ones that look as fun as they taste. And once you’ve made it once, you’ll find yourself dreaming up new versions for every season.
Mini Egg Cheesecake
Description
Ingredients
For the base
- 380 g chocolate Hob Nob biscuits can substitute digestive biscuits or Oreos
- 110 g butter melted
For the cheesecake
- 495 g full fat cream cheese
- 250 g icing sugar
- 250 ml double cream
- 1 tsp vanilla extract
- 240 g Mini Eggs crushed
- 50 g milk chocolate melted
To decorate
- 1 chocolate flake crushed
- 160 g Mini Eggs for decoration
Instructions
Prepare the base
- Crush the chocolate Hob Nob biscuits in a food bag with a rolling pin until fine crumbs form.
- Melt the butter in a saucepan, then stir in the biscuit crumbs until well combined.
- Press the mixture into an 8 or 9 inch springform tin, smoothing the surface with the back of a spoon or potato masher. Chill in the fridge while preparing the filling.
Make the filling
- In a large bowl, beat together the cream cheese, icing sugar, and vanilla extract until smooth.
- In another bowl, lightly whip the double cream until it just holds its shape.
- Gently fold the whipped cream into the cream cheese mixture until smooth and creamy.
- Stir in the crushed Mini Eggs and melted milk chocolate, mixing carefully without overworking.
Assemble and chill
- Pour the cheesecake mixture over the chilled biscuit base and spread evenly.
- Chill in the fridge for at least 4–5 hours, preferably overnight, until fully set.
- Remove from the springform tin and transfer to a serving plate. Decorate with crushed chocolate flake and extra Mini Eggs before serving.
Notes
- Always use full-fat cream cheese to ensure the cheesecake sets properly.
- For clean slices, dip a sharp knife in hot water and wipe dry before cutting.
- Decorate just before serving to keep Mini Eggs bright and crunchy.
Leave a Reply